By Brad Ocock
Photography: Brad Ocock
|
| |
In the past two stories (see links below), weve shown you how to restore your Mopars air conditioning system with help from Classic Auto Air in Tampa, Florida. The first installment detailed their restoration process for both hard and soft lines, and the filter/dryer assembly. Last month, we walked you through the restoration of the plenum box, showing that its a job the average enthusiast can tackle at home and get concours results. This time were going to follow along as Classic Auto Air restores a Mopar A/C compressor.
Whats especially interesting about this particular compressor is that it was known to be a good compressor, meaning that when it was pulled off of the donor car a few years ago, it worked. However, after tearing it down for the restoration, we discovered that although it may have worked a few years ago, it wouldnt do the job now. There were three main factors that led us to this conclusion, the first being that there was almost no oil at all in the compressor. The compressor is originally filled with 10 to 11 ounces of oil when it is installed. Between three and five ounces of oil will travel throughout the system and remain in the various hoses and components, leaving between six to eight ounces of oil in the compressor when it is disassembled.
When we drained our compressor, there was less than an ounce of oil.
We then discovered that the reed valves and valve plate assemblies in the heads had a light coat of surface rust on them. This was because the oil that routinely coats these parts had dispersed. Sometimes the valve plate assemblies can be reused when they are cleaned of surface rust. Sometimes the reed valves are too pitted to get a good seal. Ours were borderline, so that was two strikes against our compressor. Classic Auto Air recommends running your cars A/C compressor at least once a month for a few minutes to ensure that all internal components get a fresh coating of oil, even in the winter when your car is in storage.
The final strike against our compressor was that a couple of the reed valves themselves were bent and would not close tightly to form a good seal. As a result, the compressor wouldnt be able to do an efficient job. Unfortunately, the reed valves are not able to be repairedonce bent, the whole valve plate needs to be replaced. The cause of a reed valve not seating properly can be either from being tweaked by a previous service repair and a careless technician, or more likely, impatience while recharging the system. Its vitally important that when charging an A/C system with fresh refrigerant, the canister of refrigerant is in an upright position, not laying on its side. In an upright position, only the gasses at the top of the refrigerant container are siphoned off and introduced into the A/C system. If the can is tipped on its side, liquid refrigerant is poured into the system, rather than the gas.
|
| |
Gases can be compressed, which is where the reed valve comes init seals the incoming charge during the compression cycle when the system is running. Its impossible to compress a liquid, so if you run liquid refrigerant through your system while it is being recharged, when the liquid reaches the reed valve, it forces its way past, bending the valve. Impatient service technicians will often tip the can of refrigerant onto its side to fill the A/C system quicker.
In addition to the maladies listed, we had one more problem with our A/C systemthe clutch. While the clutch mechanisms field coil worked as it should, the clutch material was shot and showed obvious signs of slippage, and was on its way to total failureit would have either not turned the compressor on at all because it was slipping, or it would have seized as it wore further. Other brands of compressor clutches (Ford, GM, Sanden) can be resurfaced, but Mopar compressor clutches cannot, so a new clutch had to be located. As long as the friction surfaces are not too badly worn, the clutch can be rebuilt.
Fortunately, Classic Auto Air has shelves full of replacement Mopar clutches.
Classic Auto Air can rebuild your complete compressor, including new pistons and cranks, and they can replace or rebuild all the bearings in the system. They can also provide you with any parts you need to do the job yourself.
However, one part requiring specialized tools is the bearing in the compressor hub. The Chrysler shop manual states that the bearing must be replaced every time the magnetic clutch assembly is disassembled. It requires a special arbor attachment to press it out of the hub. Classic has this tool, but your local machine shop probably wont. If your hub assembly needs to be serviced, we recommend sending it to Classic Auto Air to let them do it, or find a good used one. We followed along as Classics Curtis Clark rebuilt our compressor.
|
| |
Click Here To Read Part I
Click Here To Read Part II
|
| |
| Article Sidebar: |
Compressor Exploded-View Diagram |
| |
| Article Source: |
| Classic Auto Air Mfg. |
| |
|
| |
|
| |
|
|
 |
|
|
|
Click to enlarge photo
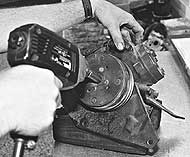
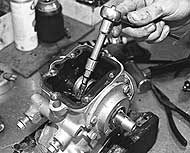
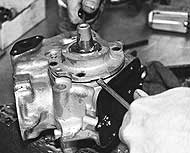
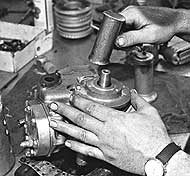
The first step is to remove the special locking bolt and washer from the crankshaft at the center of the hub.

|
|
|
|
|
Click to enlarge photo
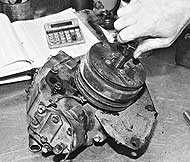
Next, insert a
5/8-1-1x2-1/2-inch bolt into the threaded portion of the hub assembly and tighten it down.
|
|
|
|
|
Click to enlarge photo
As it tightens, it will draw the whole hub assembly off the crankshaft. We used an air wrench, but it isnt necessary.
|
|
|
|
|
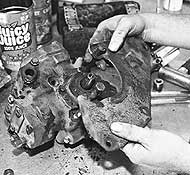
Click to enlarge photo
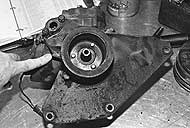
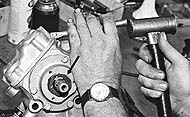
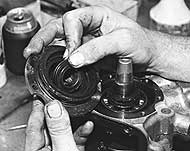
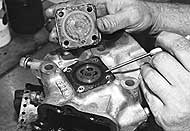
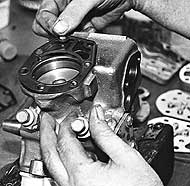
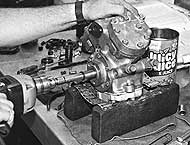
Here, were pointing to the field coils wire. The field coil is solidly attached to the compressor case, and the hub assembly slips over it, but doesnt contact it. Electricity is run through the wire and applied to the magnetic coil. It is then charged, and pulls the hub assembly (which is being spun by the fan belts) to the clutch, which is attached to the compressors crankshaft. The wire were pointing to here is for the magnetic field coil. Its very often frayed here, which can be the cause of your compressor not turning on. Ours was fine. To remove the field coil from the compressor case, remove the three bolts circled.
|
|
|

|
|
Click to enlarge photo
Heres where the wire inserts into the back of the field coil. If your wire is broken or frayed at this point, its not repairable and youll need to get a new field coil.
|
|
|
|
|
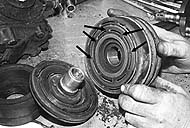
Click to enlarge photo
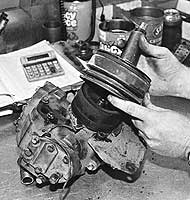
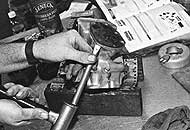
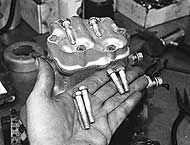
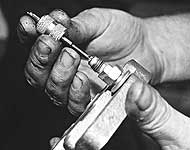
The hub (right, in hands) and clutch (left) have to be pressed apart to service the bearing in the center of the hub assembly. It requires a special tool Classic Auto Air has developed to separate the two halves. They dont recommend trying to separate the halves yourself because you can destroy the bearing as well as bend the center of the hub where the webbing is (arrows). There is no way to support it when you press the clutch out. It doesnt show in the photo, but the clutch material surface was pretty trashed from slipping, and was on its way to failing.
|
|
|
|
|
Click to enlarge photo
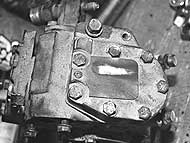
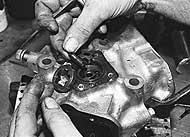
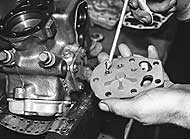
After the entire hub and field coil assembly has been removed, the compressor bracket can be taken off. Because the bolts that hold this bracket to the compressor run all the way through the compressor case from the front, the hub and coil must be removed first.
|
|
|
|
|
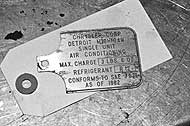
Click to enlarge photo
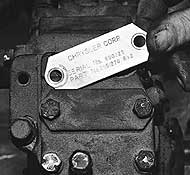
Every compressor is fitted with a build tag when it is assembled. Our compressor had been spray-bombed with black sometime before, and the tag was also coated.
|
|
|
|
|
Click to enlarge photo
A light wiping with lacquer thinner will remove the paint. Be careful, however, as too much paint remover will wipe out the lettering on the tag as well.
|
|
|
|
|
Click to enlarge photo
This tag is also found on one of the heads of the compressor. Take care not to lose it.
|
|
|
|
|
Click to enlarge photo
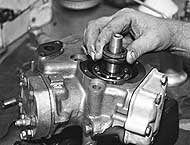
Seal the area where the shaft comes through the retaining plate (arrow) with RTV sealant, and bead blast the entire compressor as a unit. You can see remnants of the RTV around the shaft. After the compressor comes out of the bead blaster, remove the bolts from the heads and sump, and gently tap them off with a brass drift.
|
|
|

|
|
Click to enlarge photo
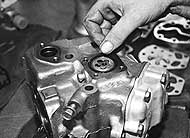
After the sump cover is off, remove the relief spring and check ball.
|
|
|
|
|
Click to enlarge photo
Next, the piston rods must be removed from the crankshaft so the crank and bearings can be removed, inspected, and replaced as
needed.
|
|
|
|
|
Click to enlarge photo
The reed valve plates also have to be removed, and they usually require a little bit of persuasion. Take care not to warp or damage them.
|
|
|
|
|
Click to enlarge photo
Remove the crankshaft bearing housing bolts, and pry it off the crankshaft with a pair of screwdrivers.
|
|
|
|
|
Click to enlarge photo
Remove the bearing and inspect it for signs of wear. Replace as necessary.
|
|
|
|
|
Click to enlarge photo
Remove the gas (or shaft) seal from the crankshaft snout. It will be replaced with a new one from Classic Auto Air.
|
|
|
|
|
Click to enlarge photo
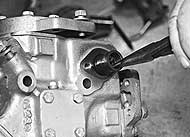
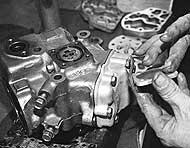
On the back side of the compressor is the EPR valve and fitting. Remove the fitting, then take the EPR valve out.
|
|
|
|
|
Click to enlarge photo
This is the compressors oil pump on the back of the compressor. Remove the four screws that hold the cover in place.
|
|
|
|
|
Click to enlarge photo
Remove the shaft, rotors, and seal. At this point, the crank can be removed from the compressor, the bearing pressed off the snout and replaced if necessary. We didnt actually need to remove the crank or pistons on this compressor, as they didnt show signs of excessive wear.
|
|
|
|
|
Click to enlarge photo
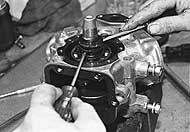
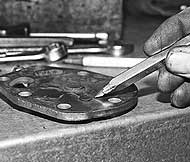
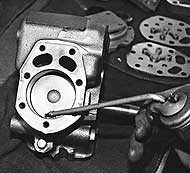
The end of the pointer is showing that one of the reed valves in the plate doesnt close all the way. There is no way to fix this, and the compressor wont work efficiently if the valve doesnt fully close. This plate can not be re-used. Very often, surface rust will also form on these plates, either making the reeds stuck shut, or too pitted to seal. Classic Auto Air has a supply of usable valve plates.
|
|
|
|
|
Click to enlarge photo
Once everything has been disassembled, inspected, and cleaned, it can start going back together. Here, the sump is going back on. Note that there are several different length bolts to hold it on. Dont mix them up.
|
|
|
|
|
Click to enlarge photo
Replace the oil pump rotors and shaft at the back of the crank, replace the seal, and re-install the plate cover.
|
|
|
|
|
Click to enlarge photo
Lubricate all components during re-assembly with refrigerant oil.
|
|
|
|
|
Click to enlarge photo
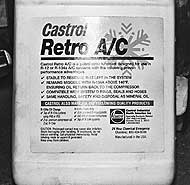
Classic Auto Air uses Castrol Retro A/C
lubricant, which is compatible with either
R-12 or R-134a systems.
|
|
|
|
|
Click to enlarge photo
Lubricate the piston and cylinder wall prior to putting the heads back on the compressor.
|
|
|
|
|
Click to enlarge photo
Install a new head gasket, lubricate the reed valve plate.
|
|
|
|
|
Click to enlarge photo
Put the head back in place and tighten it
down.
|
|
|
|
|
Click to enlarge photo
One of the heads has a service port on it with a Schrader valve in it. Just remove the whole port during disassembly, inspect it, and put it back together. This is a part your local A/C shop should be able to handle if it is broken.
|
|
|
|
|
Click to enlarge photo
Lubricate the new shaft seal and install it on the crankshaft snout until it bottoms out on the crankshaft bearing.
|
|
|

|
|
Click to enlarge photo
Install the bearing in the shaft seal cover plate, a new O-ring, slide it down over the crankshaft.
|
|
|
|
|
Click to enlarge photo
Tap it into place with a soft-faced hammer. On the back side, re-install the EPR valve and manifold.
|
|
|
|
|
Click to enlarge photo
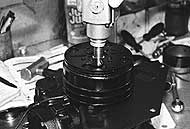
Classic Auto Air puts a drill on the crank snout and spins the compressor for a few minutes to run everything to make sure there arent any problems.
|
|
|

|
|
Click to enlarge photo
Mask off the crank snout and discharge assembly hole, and paint the compressor. Paint the compressor mounting bracket separately (to ensure good coverage), and re-install it
|
|
|
|
|
Click to enlarge photo
You dont need to do anything special to repaint the clutch and hub assembly, other than mask off the center hole for the crankshaft snout. Re-install it on the crankshaft snout.
|
|
|
|
|
Click to enlarge photo
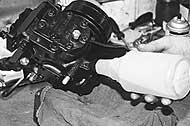
Finally, refill the compressor case with 10-11 ounces of A/C compressor oil.
|
|
|
|
|
Click to enlarge photo
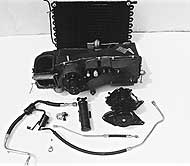
And this is the final, concours-restored A/C system after Classic Auto Air is through with it. Everything from the condenser to the plenum box has been brought back to factory specs, including the hoses and hard lines. Before anything leaves Classic Auto Air, all components are tested to make sure there are no leaks, and that everything works properly.
|
|
|
|