By Brad Ocock
Photography: Brad Ocock
|
| |
In the previous story (see the link below), we started the restoration of a complete air conditioning system with the help of Classic Auto Air in Tampa, Florida. We gave a complete overview of what the basic components of a Mopars A/C system are and how they relate to each other, discussed the different types of refrigerants available, and showed the process Classic Auto Air uses to restore the filter/drier canister to re-create a systems hard lines and fittings. To our knowledge, Classic Auto Air is pretty much the only game in town when it comes to the restoration of these pieces, but as we showed you, the level of detail and correctness is matched only by NOS pieces. In fact, Classic Auto Air components are better in most cases because there is no shelf wear or surface rust.
The second step in restoring our A/C system is to tackle the plenum box. Located under the dash, this is the central system of the cars heater, cooling, and vent system. It regulates the temperatures of the heater, houses the fan, and directs the flow of air.
Its also generally a mystery to most enthusiasts. But as we found out, other than having a special plenum clip pliers to remove the fasteners, there is nothing to taking one apart, cleaning it up, and putting it back together. We followed along as the guys at Classic restored this one, and picked up a few tips to pass along on checking components. Theyve done Mopar boxes so many times they dont need any factory diagrams, but if you tackle it yourself, we suggest getting a new manual to help you put it back together.
Basically, there are only a few things in the plenum box that can fail: any of the vacuum canisters used to open the various doors that regulate the heating and cooling, the heater and evaporator cores, the water valve assembly and temperature sensing unit, and the air conditioner and heater blower motor resistor. Checking for component failure is a simple matter of visual inspection for everything except the vacuum canisters. If there are signs of leakage on anything that has fluid in it, it needs to be repaired, just like a radiator. If the motor resistor wires are broken, it needs to be replaced. As for the vacuum canisters, its simply a matter of hooking a rubber line to one end and plugging the other port with your finger, then sucking on the line. If the lever moves, its good.
Classic Auto Air can supply you with what you need to repair or replace most any components found in your plenum box, or you can have Classic Auto Air restore the entire assembly to concours condition for you. Good, uncracked plenum boxes are also becoming harder to find, but as we discovered with ours (which was not cracked), the case and covers are made out of fiberglass and plastic, so they are easily repaired should they have been kicked once too often. Follow along as Tim Cordelieone at Classic walks us through the restoration, as well as showing us a couple of neat tips and tricks.
|
| |
In the next installment, well complete our A/C system restoration by completely rebuilding our compressor.
Click Here To Read Part I
Click Here To Read Part III
|
| |
| Article Source: |
| Classic Auto Air Mfg. |
| |
|
| |
 |
| |
| |
|
|
|

|
|
Click to enlarge photo
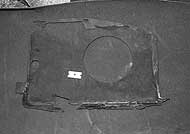
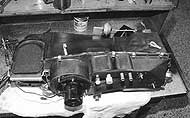
This is our starting pointthe plenum box out of a 70 Challenger. While ours came from an E-Body, the basic components and processes for disassembly and repair will work across the board.

|
|
|
|
|
Click to enlarge photo
There was evidence that this box had been opened once before, because this black rubber caulk was sticking out of the seam between the two halves.
|
|
|
|
|
Click to enlarge photo
Here is a common problem with plenum boxesslight warpage or mis-alignment between the box halves along the seam. Very often, boxes will be cracked along here as well, from being pried open with screwdrivers. If yours is broken, its made of fiberglass and can be repaired.
|
|
|
|
|
Click to enlarge photo
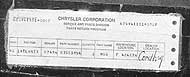
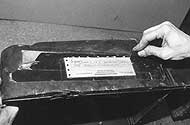
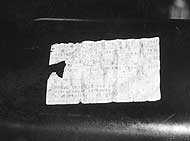
This tag taped to the outside of the box verified that it had been opened up for service at one time. Its part of the cars history, and will be saved.
|
|
|
|
|
Click to enlarge photo
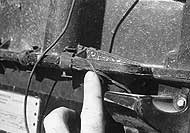
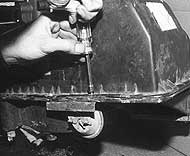
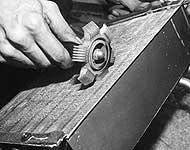
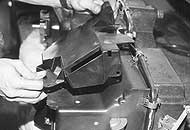
Begin by removing the plenum box clips found along the edge of the two box halves. These clips are unique fasteners that require a dedicated pliers to remove. They might be able to be pried off with a screwdriver, but damage to the box could easily result. Classic Auto Airs plenum clip pliers came from CraftsmanTM, so locating the right tool for the job shouldnt be difficult. Take care not to lose the clips, because finding new ones will be a chore.
|
|
|
|
|
Click to enlarge photo
After removing the plenum box clips, remove all the fastener screws from around the box as well. Put them in a bag and label them so you dont lose any.
|
|
|
|
|
Click to enlarge photo
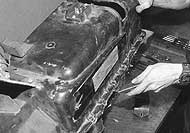
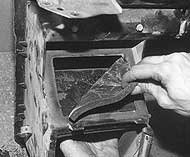
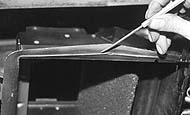
Using a sharp knife, cut the sealer between the two box halves to open up the box. Just prying the halves apart can break the box.
|
|
|
|
|
Click to enlarge photo
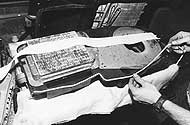
After the halves are separated, begin stripping all the parts off. This is the firewall seal to the heater core and A/C evaporator core tubes. Take care to leave it intact during removal.
|
|
|

|
|
Click to enlarge photo
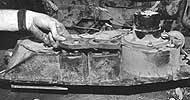
Once the screws that hold the cores in are removed, you can pull both cores out of the box. Notice all the debristhats the way we found it, and it was in the car that way. This is reason enough to open up your plenum box during a restoration!
|
|
|
|
|
Click to enlarge photo
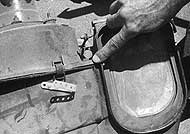
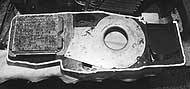
The main thing we want to show here is the rubber gasket between the box halves. It covers the whole panel on the blower motor side of the box.
|
|
|
|
|
Click to enlarge photo
The gasket was removed with a razor blade and put in a safe place. This will be used as a template for making a new gasket, so dont just scrape it off and throw it away.
|
|
|
|
|
Click to enlarge photo
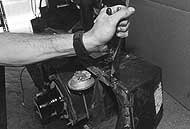
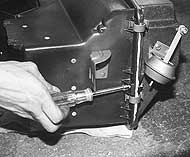
After the cores are out, the blower motor can be removed, as well as the gasket for it.
|
|
|
|
|
Click to enlarge photo
All the vacuum actuators are also removed and set aside. The guys at Classic know where they fit during reassembly just by looking at them because theyve done so many. Dont rely on your memorylabel them. A Polaroid photograph is also a good idea.
|
|
|
|
|
Click to enlarge photo
One trick Tim showed us was to scribe a small mark on the canisters to help orient them during reassembly.
|
|
|
|
|
Click to enlarge photo
There are foam seals on all of the doors on the box, and they also need to be removed with care and labeled as to where they go.
|
|
|
|
|
Click to enlarge photo
Finally, the service label is cut off and saved. Were going to put it back on, just like we found it. Its not original from the factory, but it is original to the car, and its a piece of history.
|
|
|
|
|
Click to enlarge photo
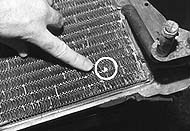
Then its time to visually inspect the parts. This heater core showed a small build-up of deposits (circled) in a few spots, indicating it may have small leaks. Pressure testing revealed that it did. If Classic Auto Air cant repair your cores, they can re-create them from scratch to be exactly like your originals.
|
|
|
|
|
Click to enlarge photo
To check the vacuum canisters, simply attach a small piece of rubber air hose to one of the ports, plug the other and suck or blow into the hoseif the arm moves, the canister is good. If yours is bad, Classic can repair or replace them.
|
|
|
|
|
Click to enlarge photo
This is the blower motor resistor. If the coils are intact, its good. If theyre broken, it needs to be replaced. You can scour the swaps, or call Classic for the replacement.
|
|
|
|
|
Click to enlarge photo
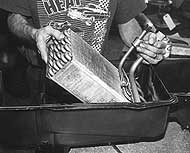
After everything is inspected, it goes into the glass beading cabinet. This is the plenum box, and as we said, its made of fiberglass. The glass beading leaves it looking white. If you do it yourself, take care to use low pressure. Notice that the factory numbers painted on the box (circled) are still there. Classic Auto Air masks off any factory markings before bead blasting to insure they arent obliterated and lost forever.
|
|
|
|
|
Click to enlarge photo
Next, the plenum box gets a simple coating of rattle can clearcoat. Here you can see that when its wet, it darkens all of the freshly-blasted fiberglass, making it black again. It stays that way after its dry, as well. After coating it in clear, it looks as good as the day it was originally assembled!
|
|
|
|
|
Click to enlarge photo
This sticker was also found on the plenum box, and care was taken to preserve it. It, too, was sealed with clearcoat after being masked off and protected during the bead blasting.
|
|
|
|
|
Click to enlarge photo
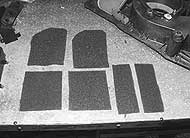
New foam insulation for the doors, available at hardware, upholstery, or fabric stores, is cut using the originals as templates.
|
|
|
|
|
Click to enlarge photo
Simple contact cement is brushed on all the doors to attach the new insulation.
|
|
|

|
|
Click to enlarge photo
The new insulation is then laid on the contact cement and allowed to dry. This is pretty much the way it came from the factory, too.
|
|
|
|
|
Click to enlarge photo
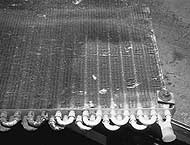
This is the condenser core, located in front of the radiator on the car. All of the cores (heater, condenser, and evaporator) are also bead-blasted. These fins are pretty delicate, and if you dont watch the pressure you could easily destroy them. If your condenser core is bad or in need of repair or restoration, Classic Auto can repair, and in many cases, recreate them from scratch as well.
|
|
|
|
|
Click to enlarge photo
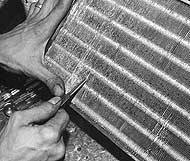
After bead blasting, the fins are first straightened using needle nose pliers. The guys at Classic filed the ends on this one flat to get in between them. This is tedious, time-consuming work.
|
|
|
|
|
Click to enlarge photo
After straightening the fins with a pliers, a special fin comb is raked between the fins, giving them a uniform appearance. The Eastwood Company sells both a duck-billed radiator fin pliers and a fin comb, which weve used with excellent results.
|
|
|
|
|
Click to enlarge photo
After theyre pressure tested and the fins are straightened, the cleaned cores are put back in the plenum box. Really, there is no reason to bead blast these coresthey dont get painted, you never see them once the box is sealed back up, and whether the outside is blasted or not has no effect on their performance. But Classic blasts them just the same.
|
|
|
|
|
Click to enlarge photo
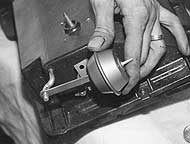
The vacuum canisters are all bead- blasted and clear coated as well, and then re-installed. A China Hat clip slides over the shaft that the actuator arm attaches to, to keep the arm in place.
|
|
|

|
|
Click to enlarge photo
This little clip is a China Hat, and it simply slides onto a shaft and locks in place by friction. To make them work like new after removing them, set it on a hard surface and whack it with a hammer to flatten out the clip a bit. Slide it back in place on the shaft, and its good as new!
|
|
|
|
|
Click to enlarge photo
The resistor also gets cleaned up and re-installed. Its important to make sure that the electric contacts are cleaned, but the rest of the cleaning is just for appearance.
|
|
|
|
|
Click to enlarge photo
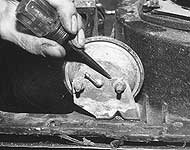
This lip is cast into the edge of the plenum box and aids in sealing it. Its important to make sure the two halves of the box have a good seal so it doesnt leak water (from condensation from the A/C core) or blow air out the sides, rather than through the vents.
|
|
|
|
|
Click to enlarge photo
Dumb-Dumb strips (a rope-like adhesive putty) are used to re-seal the box. We used white for photography purposes for this article, but its also available in black. Lay the adhesive down along the edge following all the contours of the box. Remember, if there are any gaps, you could end up with either air going through it, or water leaking onto your floor.
|
|
|
|
|
Click to enlarge photo
Tim ran two beads of sealant around the boxs mating surface to ensure a good seal.
|
|
|

|
|
Click to enlarge photo
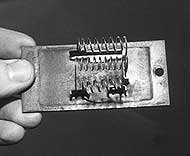
Finally, its time to join the two halves together. Take care not to damage the coils.
|
|
|

|
|
Click to enlarge photo
Install the plenum box clips first, as they will help seat the sealant. The clips were also bead blasted and sealed with clear coat. Again, you probably could get these on with a screwdriver, but they are very tight spring clips, and it would be easy to break the box. The special pliers make the job much easier. Even if you only use them once, theyre worth the investment.
|
|
|
|
|
Click to enlarge photo
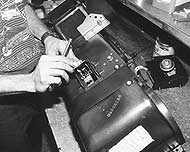
After the plenum clips are installed, install the screws that hold the two halves of the box together. These were also blasted and clearcoated.
|
|
|
|
|
Click to enlarge photo
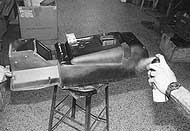
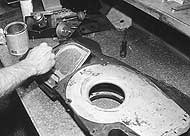
Finally, the firewall seal and appearance cover is installed. The appearance cover is plastic, and is often cracked. But because its plastic, it can be repaired and repainted, and will look new. Ours was in good shape, and was just cleaned up with lacquer thinner. Dont bead blast the plastic.
|
|
|
|
|
Click to enlarge photo
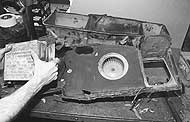
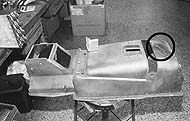
This is the final, finished plenum box, ready to be installed back under the dash of our E-Body. Other than securing new parts to replace worn or broken originals, the average enthusiast could easily duplicate these results. However, be sure to take notes, label everything as you take it off, and snap a few photos to help you remember how it all goes back together. The diagrams from a service manual will also help.
|
|
|
|