By Brad Ocock & Tom Shaw
Photography: Brad Ocock & Tom Shaw
|
| |
Now that the cruising season is just about over for most of us, maintenance and rebuild season is just beginning. Because cruising is usually limited to late Spring through early Fall, we dont want to lose valuable driving time having our cars down for non-essential repairs. For instance, if the heater is broken and its August, theres no reason to rip apart the car to fix it immediately. If we can get by without it, why park the Dodge while the weather is still nice?
One item that didnt seem to be essential when we were younger is air conditioning. I remember very distinctly removing the factory A/C system from my first car in an attempt to lighten the front end and pick up a few extra horsepower. A futile effort in a 4,000 pound car, but logic doesnt always come into play when youre 16. At the time, it seemed to make even more sense because there was a problem with the system, and I didnt have the money to fix it.
Now that many of us are driving our cars a lot more than the occasional Sunday evening drive, having cold air conditioning is becoming less of a luxury and more of a necessity when it comes to enjoying our time behind the wheel. So now that Fall is here, maybe its time to give the A/C system a thorough going through and get it working again.
|
| |
R-12 or R-134a?
When our Mopars rolled out of the factorys doors, their A/C systems were charged with Refrigerant 12Freon. Unfortunately, freon is a chlouroflourocarbon (CFC), and CFCs have since been determined by the scientific community to be a contributor to the depletion of the ozone layer. There has been a lot of debate among different political camps as to whether or not CFCs actually contribute to the depletion, whether or not the hole in the ozone is a naturally occurring event, and even whether or not the hole actually exists, but that debate isnt for these pages. The only fact we need to concern ourselves with is that R-12 is no longer manufactured in this country, and that the government has mandated that R-12 be replaced with R-134a. Thats the law, and it isnt going to change.
However, if your R-12 system still performs well, R-12 will be legal and available until the year 2030. Thats the good news. Unfortunately, right now you can expect to pay around $40 per pound for R-12, as opposed to about $8 per pound for R-134a. And domestic production of R-12 only ceased in 1994think what future prices will be!
When R-134a was first introduced, there was a lot of complaining that it wasnt as efficient at cooling as R-12. There were concerns that it would hurt systems that were designed for R-12. What that panic and concern boiled down to was that people dont like change and they dont like the government telling them they have to change. Since the introduction of R-134a, all the differences have been worked out between R-12 and R-134a, so that an R-134a system is as efficient, and will blow air as cold (or within two to three degrees at the dash vents) as an R-12 system. As for component failure, since the introduction of R-134a, the hoses and mechanicals in well-maintained A/C systems have not been shown to suffer failures as a result of using R-134a in place of R-12.
Notice we said well-maintainedif an R-12 system already has a problem, R-134a isnt going to hasten its demise, but it isnt going to help, either.
Because of this, often when a recently-converted system fails, blame is unfairly placed on the new refrigerant when, in reality, the system probably had never been serviced in its life. Also, and this is important, the filter/drier on your system should be considered a service replacement item, just like any other filter on your car. It should be replaced to rid your system of impurities and debris which it has trapped, whether or not you are converting. If you are converting, the drier needs to be replaced because the desiccant in original R-12 units is not compatible with R-134athe desiccant pellets will turn to mush and plug the filter, which will damage other components in the system. There are desiccants that are compatible with either coolant, as well as R-134a-specific desiccants.
What about everybodys complaint that R-12 systems are colder than R-134a? Al Sedita, owner of Classic Auto Air in Tampa, Florida, told us that when R-134a first came out a few years ago, that was in fact the case. But over time they found out that the industry was suggesting that R-134a systems should be charged with 90 percent as much refrigerant as the R-12 systems were charged with. Theyve since found that most systems actually require only 60-75 percent as much R-134a as the R-12 charge specs. The systems were overcharged, so they werent as efficient, says Al.
|
| |
If It Aint Broke...
So whens the time to convert your R-12 system to R-134a? The old axiom If it aint broke, dont fix it applies. If your A/C system blows cold dont worry about it. R-12 will
still be available for a long time, and buying a pound every couple of years will be cheaper than converting. However, if you have a major component failure and you have to dump a bunch of money into it, you may as well add a little more and convert it at the same time.
The major component differences between an R-12 and an R-134a system are the hoses, O-ring seals, the service ports (where the refrigerant is put into and evacuated from the system), lubricating oil, the expansion pressure relief valve (which acts
as the thermostat that turns the compressor on and off to keep it from freezing up), and the desiccant in the filter/dryer.
If you are using fresh hoses, the difference between the two is that there is an extra barrier liner on the inside of R-134a hoses. You can use fresh R-134a hoses on an R-12 system, but you cannot use fresh R-12 hoses on a R-134a system. However, if you are converting an existing R-12 system to R-134a, your old hoses are fine to use with the new R-134a refrigerant because the R-12 hoses have seasoned, so they will suffer no adverse affects from the new refrigerant. Because of this, it is virtually impossible to get standard R-12 style hoses (without the barrier lining) anymore, so this isnt much of a concern. If you replace the hoses on your car, they will likely be the R-134a type.
The service ports are different mainly as a safety feature to ensure that service centers dont mix the two refrigerants when filling or recycling the coolant. Lubricating oils have come a long way in the last 30 years, and many of them are compatible with both types of refrigerant, so if youre rebuilding your own system, make sure to check the label.
With the help of Classic Auto Air, we recently completely restored an entire A/C system out of a 70 Challenger. We followed along with them as they rebuilt the plenum box and compressor, as well as replaced the lines, custom-reproduced the fittings, and rebuilt the filter/drier.
For the compressor and plenum box, Classic Auto Air will sell you the individual parts to replace any broken or missing pieces if you choose to do the work yourself, or you can send them the components and they will do it for you. If you are going to do the work yourself, it is important to have a service manual for the year and make of car you are working on. For illustration purposes, we used diagrams taken out of a reproduction 70 manual we got from Year One.
In this story, were following along as Classic Auto Air restores the muffler, filter/drier, and the lines and fittings. By the time you read this, they will be able to completely re-create all the hard lines, rather than cutting the old hose fittings off and re-using them. In Parts II and III, well walk you through restoring a plenum box and completely rebuilding the compressor.
|
| |
|
Click Here To Read Part II
Click Here To Read Part III
Click Here for information on how to refurb to new compressor setup
|
| |
| Article Sidebar: |
R-12 and R-134a vs. The Rest |
The Players |
| |
| Article Source: |
| Classic Auto Air Manufacturing |
| Year One, Inc |
| |
|
| |
|
| |
| |
|
 |
|
|
|
Click to enlarge photo
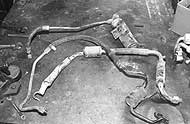
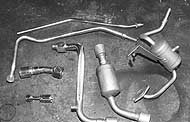
Here are all the old lines and fittings we started with. Even if yours are bent and mangled, dont throw them away! Classic Auto Air can salvage them. Notice that the crimp fittings that attach the rubber hose to the hard lines are part of the actual hard line itself.

|
|
|
|
|
Click to enlarge photo
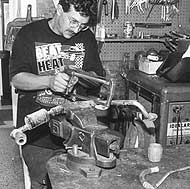
It starts with cutting the old crimp fittings and rubber hose off right at the end of the hard line. Here, Classic Autos Rob Starling is shown separating the pieces. After the fittings are cut off the hard line, the hard lines ends are de-burred.
|
|
|
|
|
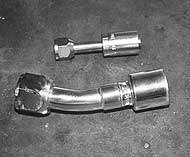
Click to enlarge photo
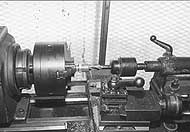
New A/C hose fittings are readily available, but they cant attach hard tube directly to rubber hose. They need a pre-installed male end on the hard line. But we just cut the ends off the hard line, right? Classic Auto Air starts with new A/C fittings and chucks them into a lathe and machines them down until they are just like the ends that were removed for a nearly correct resto appearance.
|
|
|
|
|
Click to enlarge photo
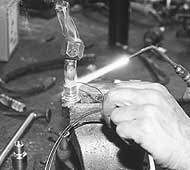
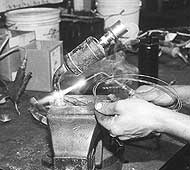
The machined fittings are then placed on the old hard lines and silver-soldered together.
|
|
|
|
|
Click to enlarge photo
These restored/recreated fittings are buffed and replated in the correct finish and are ready to have the new hoses crimped onto their ends.
|
|
|
|
|
Click to enlarge photo
All the components of the system with hose fittings on them go through the same procedure of having new ends soldered on.
|
|
|
|
|
Click to enlarge photo
Everything is bead-blasted, and then the parts that originally came plated are buffed and replated in-house, while the other pieces are prepped for paint.
|
|
|
|
|
Click to enlarge photo
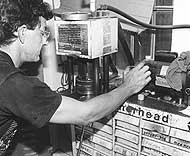
Not all hose crimps are the same. Chrysler, GM, and Ford all used different styles of crimps to attach the hard lines and fittings to the rubber hoses on their A/C system. On top of that, Chrysler used a couple of different styles itself, depending on the year of your car. Classic Auto Air has the dyes to put the correct crimps on the hose fittings. Here, Rob is using their crimping machine to install the fittings on the ends of the rubber hoses.
|
|
|
|
|
Click to enlarge photo
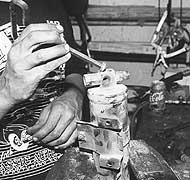
Next, they turn their attention to the filter/ drier. Because NOS filter/dryers are hard to come by, Classic Auto Air has developed a process to actually recondition, rebuild, and restore your original. Here, Rob starts by removing the sight glass and seals, the low pressure cut-out switch, and high pressure relief valve, all found on top of the filter/drier canister.
|
|
|
|
|
Click to enlarge photo
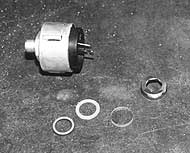
Here are the sight glass and low pressure switch components. Note the new seals.
|
|
|
|
|
Click to enlarge photo
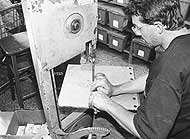
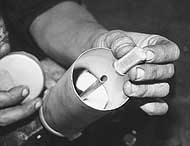
Next, the filter canister is cut apart on a band saw and the filters and desiccant are removed. There isnt much room for error during this process. Theyve cut open a lot of canisters to find the exact spot where they can open it up without damaging the internals and ruining it.
|
|
|

|
|
Click to enlarge photo
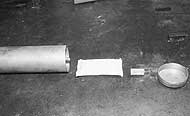
This is why the filter/drier is designed as a replacement part. The beads are the desiccant, which removes trace amounts of water moisture from the system. The rest of that powdery dust is debris from the system. This filter is from a system that was working before the owner removed it from the car. Note how dirty the filters are, too. This is how systems plug up. When that happens, bigger, more expensive parts are damaged. Those desiccant pellets were bright white when they went in. When these came out, they were olive drab.
|
|
|
|
|
Click to enlarge photo
After the canister is bead blasted, a new R-12/R-134a-compatible desiccant pack is installed as is a new filter screen.
|
|
|
|
|
Click to enlarge photo
Here you can see the new desiccant pack in the bottom of the canister, and the screen being put onto the tube. The bottom of the tube is cut at an angle as insurance against the suction holding something flat against the screen and plugging it shut. The screen is crimped onto the tube.
|
|
|
|
|
Click to enlarge photo
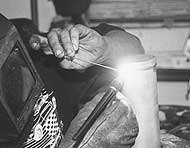
Finally, the end is put back on the canister and it is TIG-welded shut along the same seam the factory welded it. Some filter/dryers can be cut apart at the factory seam, others have to be cut elsewhere, and the seam ground smooth before repainting. That could only be learned by experience. After painting, its ready to be shipped. In the linked story, well show you how to restore the plenum box yourself.
|
|
|
|